VPN Server Implementation & Illustration in ubuntu 10.04 LTS
Been managing a remote ubuntu server for a long time using VNC. To further enhance security measures, I have ventured into VPN implementation.
VPN Server implementation:
sudo apt-get install openssh-server pptpd
pptpd is Microsoft Point to point Tunneling Protocol, chosen as such to maintain compatibility with both linux & Microsoft windows clients.
Reboot server.
sudo gedit /etc/pptpd.conf
add the following two lines to end of pptdp.conf
localip 192.168.0.234-238,192.168.0.245
remoteip 192.168.1.234-238,192.168.1.245
Above specify corresponding local & remote ip for the VPN connection.
sudo gedit /etc/ppp/pptpd-options
change the host name if you wish, default is pptpd.
sudo gedit /etc/ppp/chap-secrets
specify the user name, server, password & ip addresses allowed for connection, * for no ip address restriction.
eg.
# client server secret IP addresses
username pptpd password *
To enable ip-masquerading
sudo gedit /etc/rc.local
add the followings above 'exit 0'
iptables -t nat -A POSTROUTING -o eth0 -j MASQUERADE
To secure SSH server against brute force attack.
add the followings above 'exit 0' also.
iptables -A INPUT -i eth0 -p tcp --dport 22 -m state --state NEW -m recent --set --name SSH
iptables -A INPUT -i eth0 -p tcp --dport 22 -m state --state NEW -m recent --update --seconds 60 --hitcount 8 --rttl --name SSH -j DROP
Do check which ethernet adapter you are using for connection
ifconfig
Mine uses eth1 & I have to change all entries of eth0 to eth1 in /etc/rc.local
sudo gedit /etc/sysctl.conf
uncomment the line "net.ipv4.ip_forward=1"
Reboot server.
Router configuration:
To enable VPN pass-through on your router, do the followings
forward 1723 TCP port to your VPN server's ip address,
on some router, it is simply enabling 'pptp',
on some Dlink router, protocol is TCP & set to 6, with 1723 TCP port.
forward GRE to your VPN server's ip address,
on some Dlink router, protocol is Other & set to 4, with port field greyed out.
enable 'PPTP' & 'IPsec'.
VPN Client implementation:
On ubuntu 10.04 LTS, network-manager-pptp is needed & installed by default.
if it is not install, type in terminal:
sudo apt-get install network-manager-pptp
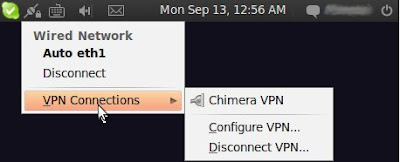
Left click on network-manager, VPN connections & select configure VPN
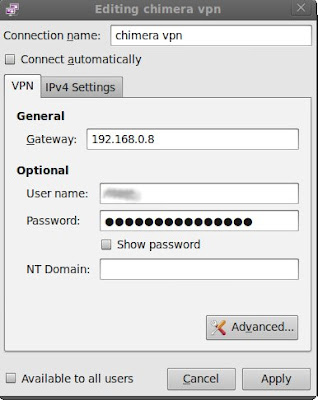
Enter connection name, gateway, username, password
Gateway can be local ip address of your server if you are connecting within same subnet.
Gateway can be your dynamic dns hostname like myvpnserver.dyndns.org, assuming you are using dyndns's service to track your dynamic ip(not covered in this article).
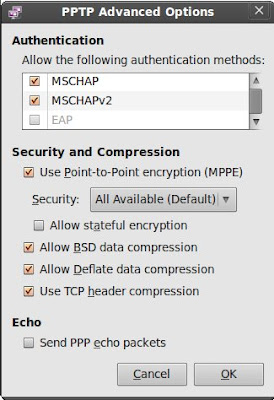
Select 'Advanced', check 'Use Point-to-Point Encryption (MPPE)'
Once setup correctly. Select network manager & your vpn connection name to connect to the server.
If everything is setup correctly, you will see the connection established.
ifconfig should give result as follow:
ppp0 Link encap:Point-to-Point Protocol
inet addr:192.168.1.234 P-t-P:192.168.0.234 Mask:255.255.255.255
UP POINTOPOINT RUNNING NOARP MULTICAST MTU:1400 Metric:1
RX packets:20 errors:0 dropped:0 overruns:0 frame:0
TX packets:32 errors:0 dropped:0 overruns:0 carrier:0
collisions:0 txqueuelen:3
RX bytes:1251 (1.2 KB) TX bytes:1778 (1.7 KB)
Note: 192.168.0.234 will be the server ip address used in subsequent client connections examples.
On Windows XP client, open network connections & select 'make new connection', 'connect to work place' & 'VPN connection'. Enter details as above & you should be connected to the server in no time.
Testing the VPN connection:
Assuming you have setup NFS server, VNC server(remote desktop) & Samba(windows share in linux) in the ubuntu server correctly(again, not covered in this article). See examples as follow:
1. VNC:
On ubuntu client pc, open 'Application', 'Internet', 'Terminal Server Client', enter the ip address of the server, select VNC protocol & click 'connect'.
In-secured connections =
ip address = 192.168.0.8
(assuming my VNC server is on 192.168.0.8 in the same subnet)
Secured connections =
ip address = 192.168.0.234
2. Windows File Sharing
On Windows client pc
Open 'My Computer', 'Tools' & select map network drive:
Similarly,
In-secured connection =
\\192.168.0.8\250g hdd or
\\callisto550\250g hdd
Secured connection =
\\192.168.0.234\250g hdd

On Ubuntu client pc using Samba
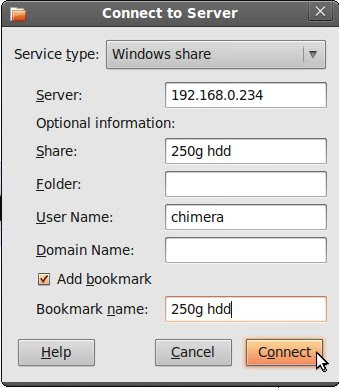
Open 'Places', 'Connect to server' & select 'Windows Share'
In-secured connection =
Server = 192.168.0.8
Secured connection =
Server = 192.168.0.234
3. NFS:
In-secured connections =
Open 'terminal', type:
sudo mount 192.168.0.8:/vpnserver/sharedfolder /clientpc/localmountpoint
(assuming my NFS server is on 192.168.0.8 in the same subnet)
(replace appropriate shared folders in your server & mount point in your client pc accordingly.)
Secured connections =
Open 'terminal', type:
sudo mount 192.168.0.234:/vpnserver/sharedfolder /clientpc/localmountpoint
One common mistake in nfs implementation is in the /etc/exports configuration
To allow access of share folder to clients within the same subnet, entry in /etc/exports should be
/tmp/sharedfolder 192.168.0.1/24 (ro,async)
To allow access of share folder to remote clients via VPN, the client pc's ip address
should be 192.168.1.234, as per example above. So, one need to modify the entry to allow access by clients in 192.168.1.1 subnet as follow
/tmp/sharedfolder 192.168.1.1/24 (ro,async)
To illustrate the encryption taking place, same files were transfered from NFS server to the Client PC using both the 'Secured VPN connection' & the 'In-secured connection' over my gigabit network.
In-secured file transfer = ~55MByte/s
Secured VPN file transfers = ~9MByte/s
So, the encryption process reduced the throughput to slightly less than one fifth of the In-secured file transfer. Of course, there is little motivation to have encrypted file transfer within a home or small office. Above example is just to illustrate encryption is actually taking place.
VPN is to be deployed for remote users to be connected to the home network as if he is locally connected. Under such implementation, the bottleneck is more likely the internet bandwidth & ping at both end of the server & client. I transferred a file from my VNC server in Singapore with a 3Mbps cable network to a client PC 550km away in Malaysia with a 1Mbps ADSL network & net a 56KByte/s throughput.
Have fun with VPN.
VPN Server implementation:
sudo apt-get install openssh-server pptpd
pptpd is Microsoft Point to point Tunneling Protocol, chosen as such to maintain compatibility with both linux & Microsoft windows clients.
Reboot server.
sudo gedit /etc/pptpd.conf
add the following two lines to end of pptdp.conf
localip 192.168.0.234-238,192.168.0.245
remoteip 192.168.1.234-238,192.168.1.245
Above specify corresponding local & remote ip for the VPN connection.
sudo gedit /etc/ppp/pptpd-options
change the host name if you wish, default is pptpd.
sudo gedit /etc/ppp/chap-secrets
specify the user name, server, password & ip addresses allowed for connection, * for no ip address restriction.
eg.
# client server secret IP addresses
username pptpd password *
To enable ip-masquerading
sudo gedit /etc/rc.local
add the followings above 'exit 0'
iptables -t nat -A POSTROUTING -o eth0 -j MASQUERADE
To secure SSH server against brute force attack.
add the followings above 'exit 0' also.
iptables -A INPUT -i eth0 -p tcp --dport 22 -m state --state NEW -m recent --set --name SSH
iptables -A INPUT -i eth0 -p tcp --dport 22 -m state --state NEW -m recent --update --seconds 60 --hitcount 8 --rttl --name SSH -j DROP
Do check which ethernet adapter you are using for connection
ifconfig
Mine uses eth1 & I have to change all entries of eth0 to eth1 in /etc/rc.local
sudo gedit /etc/sysctl.conf
uncomment the line "net.ipv4.ip_forward=1"
Reboot server.
Router configuration:
To enable VPN pass-through on your router, do the followings
forward 1723 TCP port to your VPN server's ip address,
on some router, it is simply enabling 'pptp',
on some Dlink router, protocol is TCP & set to 6, with 1723 TCP port.
forward GRE to your VPN server's ip address,
on some Dlink router, protocol is Other & set to 4, with port field greyed out.
enable 'PPTP' & 'IPsec'.
VPN Client implementation:
On ubuntu 10.04 LTS, network-manager-pptp is needed & installed by default.
if it is not install, type in terminal:
sudo apt-get install network-manager-pptp
Left click on network-manager, VPN connections & select configure VPN

Enter connection name, gateway, username, password
Gateway can be local ip address of your server if you are connecting within same subnet.
Gateway can be your dynamic dns hostname like myvpnserver.dyndns.org, assuming you are using dyndns's service to track your dynamic ip(not covered in this article).

Select 'Advanced', check 'Use Point-to-Point Encryption (MPPE)'

Once setup correctly. Select network manager & your vpn connection name to connect to the server.
If everything is setup correctly, you will see the connection established.
ifconfig should give result as follow:
ppp0 Link encap:Point-to-Point Protocol
inet addr:192.168.1.234 P-t-P:192.168.0.234 Mask:255.255.255.255
UP POINTOPOINT RUNNING NOARP MULTICAST MTU:1400 Metric:1
RX packets:20 errors:0 dropped:0 overruns:0 frame:0
TX packets:32 errors:0 dropped:0 overruns:0 carrier:0
collisions:0 txqueuelen:3
RX bytes:1251 (1.2 KB) TX bytes:1778 (1.7 KB)
Note: 192.168.0.234 will be the server ip address used in subsequent client connections examples.
On Windows XP client, open network connections & select 'make new connection', 'connect to work place' & 'VPN connection'. Enter details as above & you should be connected to the server in no time.
Testing the VPN connection:
Assuming you have setup NFS server, VNC server(remote desktop) & Samba(windows share in linux) in the ubuntu server correctly(again, not covered in this article). See examples as follow:
1. VNC:
On ubuntu client pc, open 'Application', 'Internet', 'Terminal Server Client', enter the ip address of the server, select VNC protocol & click 'connect'.
In-secured connections =
ip address = 192.168.0.8
(assuming my VNC server is on 192.168.0.8 in the same subnet)
Secured connections =
ip address = 192.168.0.234
2. Windows File Sharing
On Windows client pc
Open 'My Computer', 'Tools' & select map network drive:
Similarly,
In-secured connection =
\\192.168.0.8\250g hdd or
\\callisto550\250g hdd
Secured connection =
\\192.168.0.234\250g hdd

On Ubuntu client pc using Samba
Open 'Places', 'Connect to server' & select 'Windows Share'
In-secured connection =
Server = 192.168.0.8
Secured connection =
Server = 192.168.0.234

3. NFS:
In-secured connections =
Open 'terminal', type:
sudo mount 192.168.0.8:/vpnserver/sharedfolder /clientpc/localmountpoint
(assuming my NFS server is on 192.168.0.8 in the same subnet)
(replace appropriate shared folders in your server & mount point in your client pc accordingly.)
Secured connections =
Open 'terminal', type:
sudo mount 192.168.0.234:/vpnserver/sharedfolder /clientpc/localmountpoint
One common mistake in nfs implementation is in the /etc/exports configuration
To allow access of share folder to clients within the same subnet, entry in /etc/exports should be
/tmp/sharedfolder 192.168.0.1/24 (ro,async)
To allow access of share folder to remote clients via VPN, the client pc's ip address
should be 192.168.1.234, as per example above. So, one need to modify the entry to allow access by clients in 192.168.1.1 subnet as follow
/tmp/sharedfolder 192.168.1.1/24 (ro,async)
To illustrate the encryption taking place, same files were transfered from NFS server to the Client PC using both the 'Secured VPN connection' & the 'In-secured connection' over my gigabit network.
In-secured file transfer = ~55MByte/s
Secured VPN file transfers = ~9MByte/s
So, the encryption process reduced the throughput to slightly less than one fifth of the In-secured file transfer. Of course, there is little motivation to have encrypted file transfer within a home or small office. Above example is just to illustrate encryption is actually taking place.
VPN is to be deployed for remote users to be connected to the home network as if he is locally connected. Under such implementation, the bottleneck is more likely the internet bandwidth & ping at both end of the server & client. I transferred a file from my VNC server in Singapore with a 3Mbps cable network to a client PC 550km away in Malaysia with a 1Mbps ADSL network & net a 56KByte/s throughput.
Have fun with VPN.
posted by coyote at 8:07 AM
2 comments
![]()


