Here is my notes on setting up the NFS server in FC6 for my home network.
Setting up the server:
1.
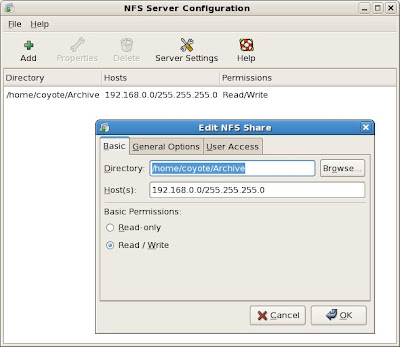
For a start one need to go to System, Administration, Server Settings, NFS.
Under Basic settings.
Directory : /home/coyote/Archive
Host: 192.168.0.0/255.255.255.0
Basic Permission: Read-only/Read/Write.
1st line: means sharing /home/coyote/Archive on the server
2nd line: all pc under the subnet 192.16.0.0 are allowed acces
3rd line: Read-only or Read & Write access.
Alternatively, one can edit the file /etc/exports to enable the same
settings manually. My /etc/exports looks like this:
/home/coyote/Archive 192.168.0.0/255.255.255.0(rw,sync)
2.
Create the file "/etc/sysconfig/nfs" and add the following contents:
STATD_PORT=4001
LOCKD_TCPPORT=4002
LOCKD_UDPPORT=4002
MOUNTD_PORT=4003
3.
Append the following to the file "/etc/services":
rquotad 4004/tcp # rpc.rquotad tcp port
rquotad 4004/udp # rpc.rquotad udp port
4.
Restart the nfs services:
/etc/init.d/nfs restart
/etc/init.d/nfslock restart
5.
Run /usr/sbin/rpcinfo -p and make sure all the ports above have changed.
6.
Next go to System, Administration, Security & Firewall
Check NFS4 as 'Trusted Services"
Under other ports, add the following ports
111:udp
111:tcp
2049:udp
2049:tcp
4001:udp
4001:tcp
4002:udp
4002:tcp
4003:udp
4003:tcp
4004:udp
4004:tcp

That pretty much sums up all the work to be done on the server.
Next, mounting the NFS volume from the client computer:
First, one need to create a mount point of your choice.
I created one under /home/username/nfsserver
using mkdir /home/username/nfsserver
To mount the volume manually, with root access,
mount -t nfs 192.168.0.9:/home/coyote/Archive home/username/nfsserver
where 192.168.0.9 is the ip address of the nfs server.
To mount the volume automatically, add the line to /etc/fstab. Mine looks like this
192.168.0.9:/home/coyote/Archive /home/username/nfsserver nfs ro 0 0
To enable the access over the internet, both the ip addresses of the nfs server & the nfs clients are to be replaced with corresponding dns names. Example above is valid only for access across a local network.
One can register domain names for the nfs server & nfs client from dyndns.org. After that, replaces the ip address of the nfs client with the new dns name. This is to be entered into the 'Host' section in the server's settings. Replaces the ip address of the nfs server with the new dns name. This is done during the mounting command or in /etc/fstab.
Note also, if your nfs server is running behind a router or a firewall, one will need to open up port 111:tcp, 111:udp, 2049:tcp & 2049:udp to the nfs server. That is done via the router's setting.
There, that concludes my learning in setting up a NFS server in FC6.


